If you want to scale STL files in Bambu Studio, it is important to do it the right way. Many 3D printing users resize models to fit the print bed, create smaller versions, or adjust parts for a specific project. However, incorrect scaling can stretch a model, change its proportions, or create print quality issues.
The good news is that Bambu Studio makes scaling simple. With the right settings, you can resize an STL model accurately while keeping its shape and overall print quality. In this guide, you will learn how to scale a model step by step and what to check before you start printing.
Import the STL File in Bambu Studio
The first step is to open Bambu Studio and load your model.
You can do this in two simple ways:
- Click File > Import > Import STL
- Drag and drop the STL file directly onto the build plate
Once the file is imported, the model will appear in the workspace. At this point, you are ready to make changes to its size.
Select the Model Before You Scale STL Files in Bambu Studio
Before resizing anything, click on the model placed on the build plate. When the object is selected, a bounding box will appear around it. This shows that the model is active and can now be edited.
If you have more than one model on the plate, make sure you select the correct one. This avoids changing the size of the wrong object.
Use the Scale Tool in Bambu Studio
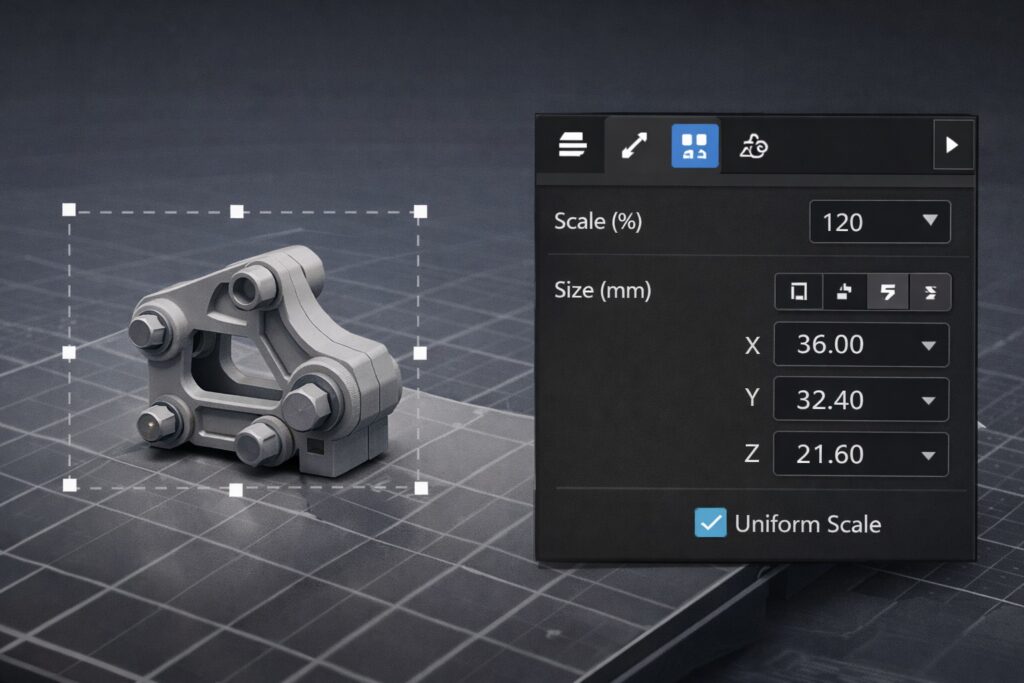
To scale STL files in Bambu Studio, click the Scale tool in the top toolbar. After you open it, a settings panel will appear.
Here you will usually see these options:
- Scale (%)
- Size (mm)
- Uniform Scale
These controls let you resize the model using either percentages or exact dimensions. This is useful if you already know the final size you need for printing.
Keep Uniform Scale Enabled
One of the most important steps is keeping Uniform Scale turned on.
When this option is enabled, the model scales evenly on the X, Y, and Z axes. In other words, the shape stays proportional. If you disable it, the model can become wider, taller, or thinner in one direction. That may be useful in rare cases, but for most STL files it will distort the original design.
If your goal is a clean and accurate resize, uniform scaling should stay enabled.
Adjust the Size or Percentage Carefully
Now you can enter the value you want.
For example:
- 80% makes the model smaller
- 120% makes the model larger
You can also type a direct measurement in millimeters if you need the model to fit a specific space. This is especially helpful for functional prints, replacement parts, or objects that must match another dimension.
When reducing a model, remember that very small details may become harder to print. Thin walls, tiny text, and fine decorative elements can lose clarity if the model is scaled down too much.
Check the Preview Before Printing
After resizing the model, switch to Preview mode before you start the print.
This step helps you inspect the sliced layers and check whether the resized model still looks correct. It is a good way to spot issues such as missing features, weak walls, or details that became too small after scaling.
Preview is especially important when you scale STL files in Bambu Studio for detailed or functional parts.
Check the Preview Before Printing
You can also practice scaling models using simple printable designs. If you are looking for beginner-friendly models, check out this collection of free animal STL files for commercial use. The list includes several easy-to-print models that work well for testing different sizes and slicer settings.
Final Thoughts
Learning how to scale STL files in Bambu Studio is a basic but important 3D printing skill. Once you understand the scale tool, uniform scaling, and preview check, resizing models becomes quick and reliable.
Whether you need a model to fit your printer bed or match a specific dimension, Bambu Studio gives you an easy way to do it without losing the original proportions of the design.