Introduction: Why Your 3D Prints Still Don’t Look “Perfect”
You’ve dialed in your settings, leveled your bed, and tuned your extrusion… yet the top surface of your 3D print still looks slightly rough, with visible lines and tiny gaps.
This is one of the most common frustrations in FDM printing.
The problem isn’t your printer—it’s the nature of how filament is deposited layer by layer. Even with perfect calibration, the top layer often leaves micro imperfections.
This is exactly where ironing comes into play.
What Is Ironing in 3D Printing? (Simple but Powerful Concept)
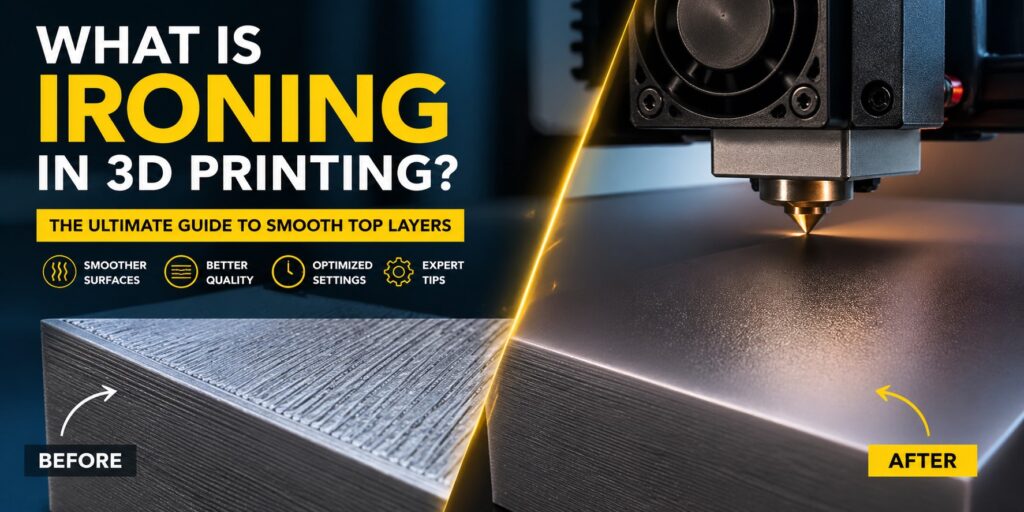
Ironing is a finishing technique built into slicers like Ultimaker Cura and PrusaSlicer.
After printing the final top layer, the nozzle passes over the surface again with:
- Extremely low flow rate
- Minimal extrusion
- Controlled movement patterns
Instead of adding new material, the nozzle gently melts and redistributes the existing filament.
Think of it like smoothing icing on a cake—but at a microscopic level.
What Actually Happens During Ironing? (Technical Perspective)
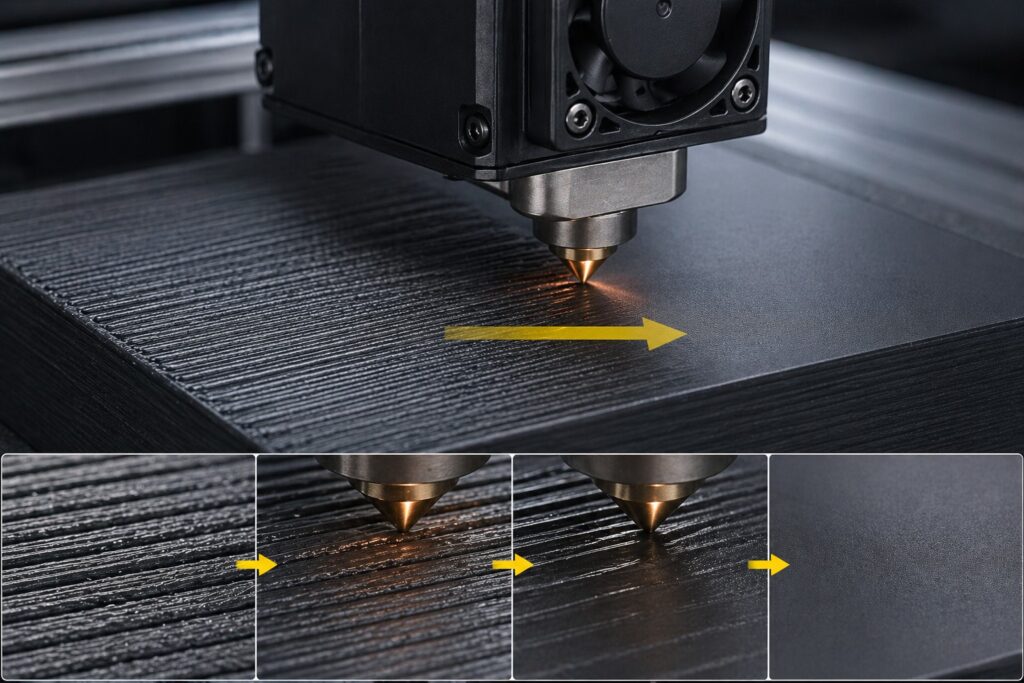
To understand ironing properly, you need to look at the physics of extrusion:
When a printer lays down filament:
- Lines don’t perfectly fuse edge-to-edge
- Tiny air gaps remain between extrusion paths
- Surface tension causes uneven ridges
During ironing:
- The nozzle reheats the top layer slightly
- Plastic softens just enough to flow
- Material fills microscopic gaps
- Surface tension evens out the layer
This results in a noticeably smoother and sometimes slightly glossy finish.
Ironing Settings Explained (With Real Impact)
Ironing Flow (Most Critical Setting)
This determines how much filament is extruded during ironing.
- 5–10% → Ideal range
- Above 15% → Over-extrusion, blobs
- Below 5% → Almost no effect
👉 Pro insight:
Too much flow doesn’t “smooth”—it actually destroys detail.
Ironing Spacing
Distance between each ironing pass.
- 0.1–0.2 mm → Ultra smooth (slower)
- 0.3+ mm → Faster but less effective
👉 Smaller spacing = more overlap = better finish
Ironing Speed
Typically much slower than print speed.
- Recommended: 10–25 mm/s
👉 If too fast → nozzle doesn’t transfer enough heat
👉 If too slow → risk of overheating or surface drag
Ironing Pattern
Most slicers offer:
- Zig-zag
- Concentric
- Lines
👉 Zig-zag is the safest and most consistent option.
Why Ironing Works (But Not Always)
Ironing works best because it targets surface-level imperfections only. It does NOT fix:
- Under-extrusion
- Poor layer adhesion
- Bad top layer thickness
If your base layers are flawed, ironing will only “hide” problems—not solve them.
When Should You Use Ironing?
✅ Perfect Use Cases
- Flat top surfaces (boxes, panels, lids)
- Decorative models
- Product photography (especially for Etsy)
- Display prints
❌ Avoid Ironing When
- Printing mechanical parts
- Surface needs grip (ironing makes it smoother/slippery)
- Model has heavy texture or detail
Material Behavior: Not All Filaments React the Same
- PLA → Best results (predictable melting)
- PETG → Can become too glossy or sticky
- ABS → Risky due to heat retention
- TPU → Generally not recommended
👉 Important:
Each material reacts differently to reheating. Ironing is essentially controlled “remelting.”
Common Problems (And How to Fix Them)
🔴 Over-Shiny Surface
Cause: Too much heat or slow speed
Fix: Increase speed slightly or reduce flow
🔴 Drag Marks / Smearing
Cause: Nozzle sticking to soft plastic
Fix: Increase Z-offset slightly or reduce temperature
🔴 No Visible Improvement
Cause: Flow too low or spacing too wide
Fix: Increase ironing flow or reduce spacing
Pro-Level Optimization Tips
- Increase top layers (at least 4–6 layers)
- Use smaller layer height (0.12–0.16 mm)
- Enable ironing only on top surfaces (not all layers)
- Combine with monotonic top layer pattern for best results
Is Ironing Worth It? (Real Answer)
Yes—but only in the right context.
Ironing can transform an average-looking print into a premium-looking product. However, it comes at the cost of increased print time.
For functional prints → skip it
For visual quality → absolutely use it
Final Thoughts
Ironing is one of those features that separates beginner prints from professional-looking results. It doesn’t require expensive hardware—just smart slicer settings.
If you’re selling prints, showcasing models, or building a brand around visual quality, ironing isn’t optional—it’s essential.